Showing posts with label Automated Testing. Show all posts

Saturday, October 31, 2026

New companion-site posts: API testing, rate limits (429s), and life after a layoff for SDET

I've published three new posts on Test Automation TV's free practice site. Two are hands-on Playwright tutorials and one is about careers. Every code example runs against the practice site, so you can copy the tests and run them without setting anything up.

SDET or SWE Lay off future careers


1. Playwright API Testing for Beginners: The request Fixture

Read the post

If your UI tests feel slow or flaky, API tests are a good place to start. They run in milliseconds and check things the UI often hides. The post shows how to:

  • Send GET, POST and PUT calls with no browser, using Playwright's built-in request fixture
  • Assert on exact status codes and JSON bodies, not only toBeOK()
    Playwright request API testing tutorial for beginners
  • Log in with a session cookie, or with Basic Auth (and why send: 'always' matters)
  • Test the unhappy paths: 401, 403 and 404
  • Combine API and UI: create data through the API and check it on the page, or log in through the API and skip the login form


Here is the smallest useful example from the post:

test('accepts a valid email address', async ({ request }) => {
  const response = await request.post('/api/validate-email', {
    data: { email: 'ada@example.com' },
  });

  expect(response).toBeOK();
  expect(await response.json()).toEqual({ message: 'Valid email address', valid: true });
});

2. Testing Rate Limits and 429s in Playwright

Read the post

This one builds on the first post, so read them in order. Rate limits work perfectly until the day they don't, and the post covers both sides:

  • The server side: prove that the sixth request returns a 429 with a valid Retry-After header, then prove the limit lifts afterwards
  • The client side: check that the page shows a countdown and disables its buttons while it waits
  • Playwright rate limiting testing 429
    A pattern worth stealing: fake the 429 with page.route() and fast-forward time with page.clock, so a 30-second wait finishes in about two seconds. It works for any slow or hard-to-trigger response, such as timeouts, expired sessions and maintenance pages.
  • Flakiness traps: parallel workers sharing one quota, and limiters that count per server process

There's a dedicated page to practise on: Rate limit & 429 practice page.

3. Laid Off as an SDET? 10 Career Paths Beyond Driving an Uber

Read the post

Less code, more career. Layoffs have hit a lot of people in QA, and SDET skills transfer further than most of us realise: real programming, systems thinking, CI/CD, debugging under pressure and an instinct for what can go wrong.

The post walks through ten paths:

  1. Performance engineer
  2. QA automation engineer, aimed at a new industry
  3. AI test engineer
  4. DevOps engineer
  5. Data engineer
  6. Security engineer
  7. Product manager
  8. Release engineer
  9. Build engineer
  10. Technical support engineer

For each one it names the specific skill gap you'd need to close. It ends with a 30-day plan: shortlist two paths, close the biggest gap, build one public proof project, reposition your CV and LinkedIn, then reach out to people already doing the job.

Try it yourself

The quickest way to learn this is to run it. Write one API test from the first post against the practice REST API, then try the fake-429 test from the second. If you get stuck, ask in the free student Discord.

These posts are part of the free companion site for my Playwright TypeScript course on Udemy, which covers E2E, API, AI and MCP testing in depth.

Happy testing!

Friday, July 24, 2026

How to Migrate Auto Web Tests from TestComplete to Playwright (Complete ROI & Strategy Guide)

Executive Summary: Planning a TestComplete to Playwright migration? Moving web test automation off expensive, legacy commercial software to modern open-source testing frameworks like Playwright is one of the highest-ROI technical initiatives a QA organization can execute. This guide outlines the financial ROI argument, licensing cost savings, and four actionable technical migration strategies.

Udemy Course: Playwright TypeScript Automation Testing

Please check my free Playwright practice site.

The Hidden Costs & Technical Debt of TestComplete Web Automation

Poorly structured test automation code in legacy engines like SmartBear TestComplete creates severe technical debt. Because commercial testing tools tightly couple script execution, node configurations, dynamic object recognition maps, and license keys, unrefactored web test suites quickly cause continuous integration (CI) bottlenecks:

  • Name Mapping Bloat: Deeply nested dynamic object paths and missing wildcard locators cause cascading test failures across regression suites whenever UI components change.
  • Flaky Test Execution & Synchronization Bottlenecks: Hardcoded static delays (aqUtils.Delay) inflate test runtimes and waste expensive execution runner nodes. Missing dynamic wait hooks lead to persistent flaky test runs.
  • Resource & Memory Leaks in CI/CD Pipelines: Unreleased COM/OLE objects or unmanaged target application processes degrade continuous testing nodes during large parallel test runs.
  • Expensive Licensing Constraints: Node-locked and floating license keys restrict how many parallel runners your CI/CD pipeline can run simultaneously without ballooning software budgets.

TestComplete vs Playwright: ROI & Licensing Cost Comparison

Replacing TestComplete with Playwright drastically improves your test automation ROI by eliminating recurring license fees and shifting test ownership directly into modern developer workflows:

Evaluation Criteria SmartBear TestComplete (Legacy) Microsoft Playwright (Modern Open-Source)
Software Licensing Cost $5,000–$10,000+ / seat / year 100% Free Open-Source (Apache 2.0)
CI/CD Parallelization Paid execution licenses required per pipeline node Uncapped parallel runs in Docker & GitHub Actions
Developer Adoption & IDE Support Siloed inside proprietary IDE / dedicated QA seats Native TypeScript, C#, and Python in VS Code
Test Synchronization Strategy Manual aqUtils.Delay & explicit wait methods Built-in web-first auto-waiting assertions

4 Strategies to Migrate from TestComplete to Playwright

1. The Strangler Fig Migration Pattern (Recommended)

Avoid high-risk "big bang" rewrites by running both test automation frameworks side-by-side inside your continuous deployment pipeline:

[ Continuous Integration Pipeline ]
       │
       ├──► TestComplete (Legacy Regression Suites - Frozen)
       │
       └──► Playwright   (New End-to-End Tests - Growing)
  • Freeze Legacy Scripting: Enforce an explicit team policy: No new web automation tests are written in TestComplete. All new feature testing is built in Playwright.
  • Page Object Model (POM) Refactoring: Translate legacy XML-based NameMapping repositories into modular Playwright Page Objects using resilient, user-centric locators (e.g., page.getByRole()).
  • Phased License Sunset: Progressively shift smoke test suites and critical user journeys over to Playwright until TestComplete renewal dates arrive.

2. AI-Assisted Code & Locator Conversion

If your team has existing JavaScript/JScript test scripts in TestComplete, use AI coding tools (such as ChatGPT, Claude, or GitHub Copilot) to convert legacy code into clean TypeScript Playwright scripts:

// ❌ Legacy TestComplete JScript (Brittle dynamic object aliases & hardcoded delays)
Aliases.pageApp.formLogin.btnSubmit.Click();
aqUtils.Delay(5000);

// ✅ Modern Playwright TypeScript (Auto-waiting & accessibility locators)
await page.getByRole('button', { name: 'Submit' }).click();

3. Playwright Codegen for Keyword Test Suites

For teams relying on TestComplete visual Keyword Tests, direct code translation isn't an option. Use Playwright’s built-in code generator to re-record user flows into modern code fast:

npx playwright codegen https://your-app-url.com

4. Optimizing Test Setup with Playwright API Contexts

Legacy E2E tests waste time navigating multi-step UI forms just to prepare test data. Playwright allows you to handle state setup via lightweight API requests:

  • Bypass UI-driven login steps by sending authentication calls through Playwright's native request context.
  • Inject session tokens and cookies straight into browser storage using browserContext.addCookies().
  • Reduce test execution times by 60–80% compared to traditional TestComplete UI workflows.

Summary: Modernizing Your QA Pipeline

Replacing TestComplete with Playwright isn't just about saving thousands of dollars in licensing fees—it's about building a fast, scalable, open-source test automation strategy that developers and QA engineers love working with.

Ready to Master Playwright Automation?

Master the transition from legacy automation tools to production-ready Playwright frameworks. Learn real-world Page Object Models, parallel CI/CD integration, and advanced locator strategies.

🚀 Explore the Complete Playwright Course

Friday, September 8, 2023

Does it make sense to use the Page object in a project with API tests?


Udemy Course: Playwright TypeScript Automation Testing

There be more suitable approaches than using the Page Object pattern in an API test automation project. The Page Object pattern is used in end-to-end test automation testing(with libraries like Selenium, Cypress, and PlayWright). You abstract web pages into objects to make the test code more readable, maintainable, and reusable. It helps interact with and manipulate web elements like buttons, forms, and links.


In API testing, you deal with an application's backend, Sending HTTP requests and validating the responses. The concepts of web pages and UI elements do not apply in the same way as they do in UI automation testing. Instead, in API testing, you work with the following:


1. HTTP Requests: You send HTTP requests (e.g., GET, POST, PUT, DELETE) to specific API endpoints to interact with the backend services.


2. Response Validation: You confirm the responses received from the API endpoints. You check for expected status codes, headers, and response data structures.


3. Data Manipulation: You might need to manipulate and process data returned by the API. For example, you will extract values for further use or transform data to validate assertions.


In API testing, it's more common to organize your code around HTTP request libraries or frameworks (e.g., using tools like Postman, RestAssured, or Python's requests library). Yet, you can still apply some best practices listed to make your API tests maintainable:


Modularization: Organize your API requests and response validation code into reusable functions or modules. This makes it easier to maintain and update your tests.


Configuration Management: Store API endpoints, request headers, and other configuration settings in a central location or configuration files to ensure consistency and ease of maintenance.


Test Data Management: Handle test data from test code so you can change data inputs and expected outputs without modifying your test scripts.


Test Reporting: Implement a reporting mechanism to track test results and monitor the health of your API endpoints.


In summary, while the Page Object pattern is valuable for UI automation testing, it does not apply to API testing. Instead, prioritize organizing your API testing code to make it readable, maintainable, and efficient for working with HTTP requests and responses.

Tuesday, November 23, 2021

What are sections in a robot framework file?

Robot Framework and Visual Studio Code Logos

Udemy Course: Playwright TypeScript Automation Testing


In this tutorial, we will create an empty Robot Framework script that will later be used for test automation.

Robot Framework scripts are plain text files with the extension .robot. 

Each robot framework file contains a suite that can contain Tests or Tasks.


What are the sections in Robot Framework? 

Each file needs predefined sections; examples of Robot Framework sections are listed below:

  • Setting
  • Keywords
  • Test Cases

How do you define a section in a .robot file? 

The sections in a Robot Framework script are defined using a specific convention.

The Robot Framework Language Server makes our lives easier by helping us do the right things in the correct format. 

To see a practical example, Let's open the Visual Studio Code. 

Let's click Open Folder and select a folder to store our test automation or RPA Robot Framework scripts which we will create together in this course.

Robot Framework Visual Studio Code Screenshot


After opening a folder, let's create a new file to store our Robot framework automation script. 

I'll call it Section1.robot


What is the structure of a section name in Robot Framework? 

Now I'll click in the text editor and type a triple asterisk *** followed by the word settings. 

Intellisense will help us do this easily. 

*** Settings ***

A section in a robot file is defined by starting a new line with three asterisks, a whitespace, the section name, another whitespace, and three asterisks at the end of the line. 

***[space]<section name>[space]***[newline]

I'll press enter and repeat the same process for more sections, like Keywords and Test Cases.

We can also have a Variables section, but I'll explain it in the post in this series[link]. 

Now save the file by pressing Ctrl + S. I'll call it first-script.robot

(the file extension of robot script files is .robot)

This is an empty script. But still, we can use it to find whether we've done everything correctly so far. 

To run this empty script, we will click the terminal menu item and select "New Terminal." 

Over here, let's type robot space Section1, press the tab, and enter. 

The Robot Framework will tell you that the test suite defined in this file does not contain tests or tasks. 

Don't worry; we'll fill the empty sections later. 

For now, we have set up Robot Framework correctly and have already created an empty shell suite file for our use.

Next post in this series >> Next

Sunday, September 12, 2021

The Role of Browser Driver in Test automation and Downloading Google ChromeDriver to use with Selenium and Robot Framework

 The role of browser driver in test automation and downloading Chrome driver


Udemy Course: Playwright TypeScript Automation Testing

For running browser-based UI test automation on a browser, we need to have a browser installed on our PC. I got the Google Chrome browser installed. 

But we also need to install a “browser driver". 

You must be thinking, why do we need a browser driver for test automation, what does it do? 

Let me explain why. 


When we write test automation scripts in Robot Framework, our scripts utilize the Selenium library to control the actions of various web elements through the Selenium Library. 

Because a browser can be created in many different ways. There can be serious differences in what an automation software needs to do for controlling different browsers through automation. 

The creators of Selenium library can’t always stay up to date with the fine details of every supported browser all the time. 

That is why the browser makers have taken up the responsibility for providing the components or drivers needed for controlling their browsers through automation. 

These drivers conform to the industry standard web specifications(link). 

Drivers are available for most popular browsers like Google Chrome, Mozilla Firefox, and Microsoft Edge.

The driver software used to automate the Chrome browser is called Chrome Driver.

For Firefox it is called Firefox drive, and for Edge, you would’ve guessed it already. Edge Drive. 

Different versions of Chrome browser are controlled through different versions of Chrome Driver. 

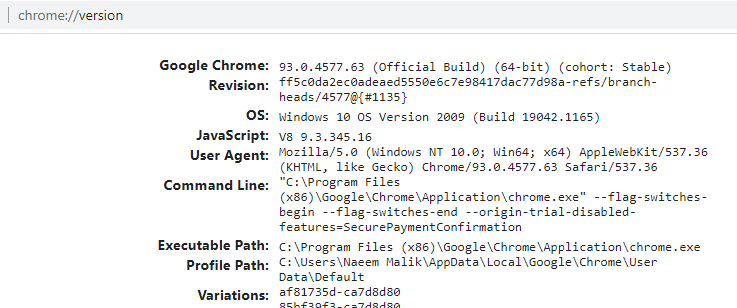
Before downloading the driver, we need to check the version of Chrome browser which is installed on your PC.

I will open the Chrome browser and click on the address bar. 

Now type chrome://version and hit enter. 


You can see which version of Chrome is installed. 

We will Download the specific driver file for the version of the browser which we have installed on our machine. 

Let’s open a new tab and search for Selenium chrome driver.


Now open the first link

Over here, I’ll click a ChromeDriver link for a suitable version of the Chrome driver(link).


Right now there are drivers for multiple versions of Chrome.

These numbers will change in the future and you should download the relevant version. 

Let me click the Chrome Driver link. 

Since I’m on Windows, I’ll download the driver for Win32. A separate x64 bit driver is not available as of now. 

Once the driver is downloaded. Let’s copy it to a separate folder. 

I’ve created a new folder on C drive and called it Chrome Drivers. 

In fact, let’s call it SeleniumDrivers instead. 

How to add ChromeDriver path to Environment Variables

We’re going to add the path of this folder to our system Environment Variables because that will make our lives easier. 

On Windows 10, I’ll click the start button and type Settings. 


Over here I’ll search for environment variables. 

I’ll select “Edit the system environment variables”


Click on “Environment Variables” button

Double click  “Path” 

Click “New” and paste the path of the folder where you’ve placed the Chrome driver. 

Now close the environment variables. 

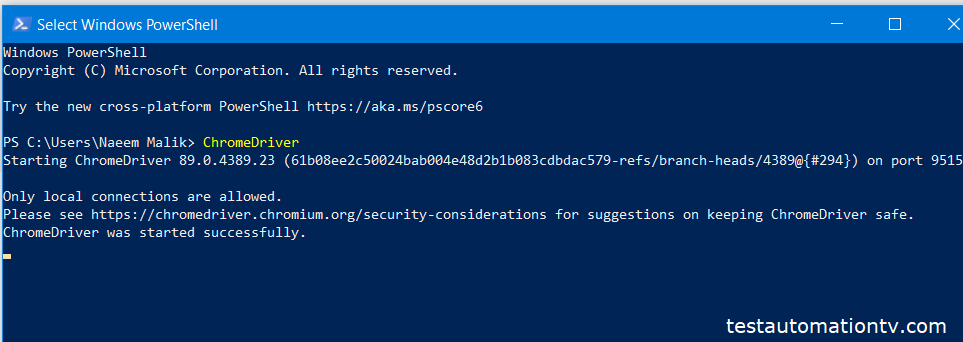
A quick way to see if you’ve configured the path correctly is by opening PowerShell and running the command “ChromeDriver”. 

You see that the console says “Chrome Driver started successfully”


Let’s close the window and proceed. 

This is the end of this article. Do check the previous articles in this series and the next one(coming soon).

All articles in Robot Framework Tutorial Series


  1. Introduction to Robot Framework, Test Automation, and RPA Tool
  2. Installing RobotFramework, RobotFrameworkSelenium, Python on your PC & updating Pip
  3. Robot Framework with VS Code and RF Language Server
  4. The role of browser driver in test automation and downloading Google ChromeDriver to use with Selenium and Robot Framework

Monday, August 16, 2021

Robot Framework with VS Code and RF Language Server

 Installing Visual Studio Code and Robot Framework Language Server 

VS Code, Robot Framework, and Python/Pip installation for test automation


Udemy Course: Playwright TypeScript Automation Testing


Robot scripts are plain text files.

You can create and edit Robot Framework scripts in any text editor like Notepad, but you might make small mistakes that could be hard to catch. Proper tools are also available to make your life easier. 

These tools are helpful especially when you’re starting afresh. 

One such tool is Visual Studio Code. VS Code is available for many platforms including Windows, Linux, and Mac.

An alternative is IntelliJ PyCharm IDE but in this tutorial, I will to show you how to setup VS Code for creating Robot Framework automation scripts. 

I’ll launch the browser and download Visual Studio Code


Let’s install it. You'll need to agree to the terms and conditions.

We'll select all options on “Select Additional Tasks”  and click Next then click Install.

I’ll checked the “Launch Visual Studio Code” option and click Finish


Visual Studio Code will open after you click the finish button.

How to Install Robot Framework Language Extension

Maximize the VS Code window and click the Extensions icon on the left side.


Search for “Robot Framework Language Server Extensions” and install it


After this search for “Python” in plugins and install the one from Microsoft. 


When the installation is finished, we’ll be good to start work with Robot Framework but there is one small pre-requisite we still have to download to run automation.

I'll show that to you in my next article.

Stay tuned. If you have any questions, please feel free to ask.

All articles in the Robot Framework Test Automation series


  1. Introduction to Robot Framework, Test Automation, and RPA Tool
  2. Installing RobotFramework, RobotFrameworkSelenium, Python on your PC & updating Pip
  3. Robot Framework with VS Code and RF Language Server
  4. The role of browser driver in test automation and downloading Google ChromeDriver to use with Selenium and Robot Framework

Monday, April 19, 2021

Introduction to Robot Framework, Test Automation and RPA Tool

What is Robot Framework

Robot Framework is a test automation framework. Robot Framework is a keyword-driven automation framework. It is written in Python but you can use it without knowing the language. Robot Framework is also known as RF.


Keywords in Robot Framework

To create automation scripts using Robot Framework, we utilize certain predefined keywords.

Some examples of keywords are

  • Click Button
  • Wait Until Element is Visible
  • And
  • Input Text


All of these keywords take parameters that are used to control their behavior.

For example, the keyword Click Button and the keyword Wait Until Element is Visible of Selenium Library allow us to supply the information about the button we want to click and the element we want to wait for. 


The Input text keyword lets us specify two things:

1. where we want to input text

2. what text do we want to input.


Many keyword libraries for Robot Framework are available. You can test almost any system using Robot Framework libraries. 


The numerous versatile libraries are the real superpower of Robot Framework. It is possible to create complete test automation and quality assurance solutions with Robot Framework. 


Advantages of Robot Framework

Robot Framework is Python-based, but unlike many other automation tools, you don’t need to take a programming course before you start to learn Robot Framework.

The requirement to learn a programming language such as Python, Java, or C# is the first barrier of entry for many QA professionals who want to learn test automation. Python Framework liberates you from this prerequisite.


We can use multiple IDEs to write Robot Framework tests. 

For example, IntelliJ PyCharm IDE, Microsoft Visual Studio Code IDE, and the open-source Robot IDE or RIDE. 

On an interesting side note, Robot Framework can also be used in a Java-based ecosystem through Jython and in .Net through IronPython.

Robot Framework can also be used for Robotic Process Automation(RPA). 


Where You Shouldn't Use Robot Framework

Robot Framework is not a record and playback-based test automation tool. It is more like  Lego for test automation. Many ready-made pieces are available for you to combine and make your own masterpiece.


The first version of Robot Framework was launched in 2005. Robot Framework has very strong community support. The Slack channel RobotFramework is very active.

Robot Framework version 7.1.1, which was released on October 19, 2024..

A lot of libraries are available to be used with Robot Framework.


Popular Robot Framework Libraries

A list of popular robot framework libraries is given below:

  • Selenium Library
  • Appium Library
  • Request
  • Soap Library
  • Database Library
  • Browser Library
  • Archive Library


Robot Framework is an easy-to-use, versatile, and extensive tool. It has survived the test of time and it is here to stay.


Let us proceed toward installing the tools needed to start using Robot Framework. 


All articles in the Robot Framework Series


  1. Introduction to Robot Framework, Test Automation, and RPA Tool
  2. Installing RobotFramework, RobotFrameworkSelenium, Python on your PC & updating Pip
  3. Robot Framework with VS Code and RF Language Server
  4. The role of browser driver in test automation and downloading Google ChromeDriver to use with Selenium and Robot Framework

Friday, May 15, 2020

WinAppDriver Tutorial: Using Appium Client For Object Inspection in Windows Desktop Test Automation

Appium Server Windows with Free Test Automation Tool WinAppDriver Object Inspector


Download free e-book Windows Test Automation With Appium Windows Application Driver in C# .Net


Introduction to Appium Desktop Client


When I created my Udemy Course about WinAppDriverUI Automation Testing in 2019, I relied solely on the WinAppDriver UI Recorder to inspect various Windows application elements. I showed how to automate. Only a little information was available on the subject back then. I recently came across another tool we can use to look into various application elements and find their attributes for UI test automation.

This article shows you just that because it has the potential to make your life easier. I've also added the same videos to my Udemy course and YouTube channel. This tool is called the Appium Desktop.  

This post will serve as an introductory WinAppDriver tutorial. I am going to show you how to use an alternative of
WinAppDriver UI Recorder.
You can download it from the Appium.io website. 

Before we proceed, please remember there are two prerequisites for using Appium Desktop. 
  1. Enable Windows 10 Developer Mode on your PC
  2. You need to have WinAppDriver 1.1 or above installed on your PC. 


    You don't need to install Node.js to run an Appium desktop client, as shown in this WinAppDriver tutorial. Let me google the search term Appium Desktop client quickly and guide you. You also don't need to download WinAppDriver UI Recorder.

    Download Appium Desktop on Windows

    This will take us to the GitHub repository of the Appium Desktop project. You will need to download the Appium-windows.exe from here and use it to install an Appium desktop.

    Please see the screenshot below.


    Appium Desktop Download Items
    Once you've got Appium Desktop installed, you can proceed further. We are going to start using Appium Desktop for inspecting Windows Applications. If you have the proper tools installed, please note that you can use the same utility to check apps on other Appium-supported platforms, such as Android and iOS. Although that's beyond the scope of this blog.


    Running Appium Desktop Client and Connecting to a Windows Application


    Before we use the Appium Desktop Client to inspect the elements of a Windows application's features, we must start the Windows Application Driver through WinAppDriver.exe. 


    Learn WinAppDriver Automation Testing Free Tools

    Now let's run the Appium Desktop Client; you can find it in your Windows applications. First, click the "Start" button and type Appium. 


    Appium Client in Windows Apps List

    Now click the "Appium" icon to open the application. The Appium desktop client can take a few seconds to load. Then, on the main Appium UI, go to the "File" menu and select "New Session Window." 

    Appium New Session on Windows

    A new dialog box will open up. The tab "Custom Server" will be selected. I'll leave the remote host and remote port fields unchanged. In the Remote Path field, I'm going to put a forward slash. Then there's this table-like Ui to specify Desired Capabilities. I will click on the first text box containing the "Name." I will type the word app in there. Please note the phrase app will be small. In the value textbox, I'll paste the user mode ID of the Microsoft Windows 10 Calculator app, which is:

    Microsoft.WindowsCalculator_8wekyb3d8bbwe!App


    I've shown how to find this value in my course. The final screenshot of the Appium custom server is shown below. FYI: 

    Setting AppiumOptions in Appium Client for Windows Automation Example


    Now Appium Client will connect the instance of WinAppDriver, which is running on this PC and listening on port number 4723. Remember, we started it earlier. I'll press the button "Start Session."

    Appium Client Inspecting Windows Calculator Example


    The calculator app will start, and you'll get a preview inside the Appium UI Recorder. You can hover the mouse on various application controls under the test, highlighted in yellow. In my case, the mouse cursor is also changing into a hand, but it was not captured in the screenshot.


    Appium UI inspector

    Let's end this section here, and we will learn more about the free Appium UI Inspector
    in the selection below. It is an essential tool for Appium-based automation.


    Inspecting Elements Using Appium Desktop Client and WinAppDriver For Automated Testing


    Once we have created a session in Appium Client, we can inspect various elements of the loaded application. The Appium Client object inspector UI is pretty simple. A button row is on the top, and "Select Elements" is clicked by default. 


    Appium Client Select Element Windows Automation
    1. We have the application preview loaded on the left side.
    2. "App Source" in the middle shows the hierarchy of application controls. 
    3. The rightmost panel is "Selected Element." It will populate when we click an element. 


    Appium Client Object Inspector Windows Selected Element


    For Example, we will hover the mouse on the application preview shown in the Appium Desktop Client. 


    You will see that the element under the cursor will highlight yellow. Let's click on button two in the application preview. You see, its color will change. In addition, you'll find tributes to this Windows Element will load in the right-hand pane. I've highlighted some properties/attributes (Name, AutomationId) that we can use for automation in the screenshot below.


    Windows WebElement Properties in Appium Client GUI Inspector

    The same thing will happen if we click the calculation results textbox on the top. 

    You can use the Appium desktop client to inspect Windows applications. However, other options on this screen could be more helpful. Instead, click on the given line to find out How to Download and Run WinAppDriver UI Recorder.

    Oxygen IDE Support: 


    Please note that you can record automated UI tests using Appium Desktop Inspector to run with Oxygen IDE. You'll need to have proper tools installed for that. This includes Android Studio, which is overhead, but so far, that's the way Oxygen IDE architecture is, and they don't have any plans to remove the dependency anytime soon. You can find more by visiting this link.

    You can now play with the inspector further to see more options. I am going to close it now. In the following video, I'll show you how to use the app arguments desired capability in Appium Desktop Client.

    app arguments Specifying Additional Desired Capabilities in
    Appium Desktop Client


    How to use appArguments AppiumOption/DesiredCapability in Appium? 

    We can specify more additional capabilities using the Appium Desktop Client. These capabilities can have various effects on our tests and are something not available in WinAppDriver UI Recorder. For Example, if we want to open Notepad with a file loaded into it already. Please note that you can't do the same thing in WinAppDriver UI Recorder software.

    Let us create a new session. In the app's default capability, I'll put "Notepad." Then I'll click the plus sign and add app arguments in the desired skills. Finally, I'll put the file's path we want to open in the value field.

    For Example, in my case, C:\Users\Naeem\Desktop\bunch of text.txt. Please note that we won't put double quotes around the path. The final screenshot of our new Appium client custom server to launch Windows 10 Notepad with a file opened inside of it is given below:


    How to configure Appium desktop client with WinAppDriver on Windows

    I'll click the "Start Session" button. You'll see that the file you specified as a parameter will open. 


    If you're doing Microsoft Excel automation, Microsoft Excel can use the same technique to open a file right out of the gates. You may need to test an Excel plugin with test automation using WinAppDriver(Free automation tool).


    Click on the link to find out "How to Download and Run WinAppDriver UI Recorder."
    It is also possible to open files in Microsoft Excel launched through WinAppDriver using appArguments Appium Option. 
    Specify the desired capabilities in your test automation code will be done through the method call listed below: 

    AppiumOptions.AddAdditionalCapability("appArguments", "c:\textfile.txt");
    AppiumOptions.AddAdditionalCapability("ms:waitForAppLaunch", "50");

    ms:waitForAppLaunch Handling Splash Screen in WinAppDriver


    How to wait for an application splash screen to display? For Example, how to use ms:waitForAppLaunch AppiumOption? 

    Some applications show a splash screen when they launch. Unfortunately, the splash is mistakenly considered the main application window by the WinAppDriver, leading to automation failure. 


    Microsoft Outlook Automation Testing with Appium WinAppDriver


    If you're using WinAppDriver 1.2 RC, you can also make the WinAppDriver wait a bit so that the splash goes away, and then the WinAppDriver attaches to the application window. 

    For Example, let's try a demo with Microsoft Outlook(2019), a Desktop e-mail client application. 

    A free code sample of Outlook 2019 automation using WinAppDriver can be found in your GitHub repository. I am going to launch it straightforwardly. Then, I'll create a new session window and put Outlook against the "app" in desired capabilities. 

    Now I'll click the "Start Session" button.


    Appium Client Object Inspector Loading Outlook for WinAppDriver Automation


    You'll see that the app preview will not load. The progress animation will keep spinning. Let's close the session window and come again. This time, I'm going to add a new Desired Capability. In the name field, I'll put ms:waitForAppLaunch in the value field, I'll put the number 15. 

    Now I'll click the "Start Session" button. 


    Windows Outlook Appium Client AppiumOptions Values

    This time, you'll see that the application preview will take a while to load in the Appium Desktop Client. This is because now you can check all Windows elements' properties inside this application. 
    Outlook Windows Mailing List Screenshot for Free Windows Automation Tool


    This is the end of this article, and I hope you found it helpful. Please feel free to ask questions.

    Do share it in your social circles as well. Please also visit my Udemy course; the link is given AppiumWinAppDriver UI Automation Testing.

    Hopefully, you found this lesson to be valuable. If you want me to write another WinAppDriver tutorial, just let me know. This article was updated in 2023.