The role of browser driver in test automation and downloading Chrome driver
For running browser-based UI test automation on a browser, we need to have a browser installed on our PC. I got the Google Chrome browser installed.
But we also need to install a “browser driver".
You must be thinking, why do we need a browser driver for test automation, what does it do?
Let me explain why.
When we write test automation scripts in Robot Framework, our scripts utilize the Selenium library to control the actions of various web elements through the Selenium Library.
Because a browser can be created in many different ways. There can be serious differences in what an automation software needs to do for controlling different browsers through automation.
The creators of Selenium library can’t always stay up to date with the fine details of every supported browser all the time.
That is why the browser makers have taken up the responsibility for providing the components or drivers needed for controlling their browsers through automation.
These drivers conform to the industry standard web specifications(link).
Drivers are available for most popular browsers like Google Chrome, Mozilla Firefox, and Microsoft Edge.
The driver software used to automate the Chrome browser is called Chrome Driver.
For Firefox it is called Firefox drive, and for Edge, you would’ve guessed it already. Edge Drive.
Different versions of Chrome browser are controlled through different versions of Chrome Driver.
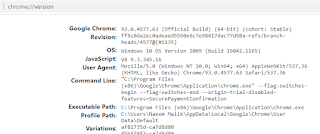
Before downloading the driver, we need to check the version of Chrome browser which is installed on your PC.
I will open the Chrome browser and click on the address bar.
Now type chrome://version and hit enter.
You can see which version of Chrome is installed.
We will Download the specific driver file for the version of the browser which we have installed on our machine.
Let’s open a new tab and search for Selenium chrome driver.
Now open the first link
Over here, I’ll click a ChromeDriver link for a suitable version of the Chrome driver(link).
Right now there are drivers for multiple versions of Chrome.
These numbers will change in the future and you should download the relevant version.
Let me click the Chrome Driver link.
Since I’m on Windows, I’ll download the driver for Win32. A separate x64 bit driver is not available as of now.
Once the driver is downloaded. Let’s copy it to a separate folder.
I’ve created a new folder on C drive and called it Chrome Drivers.
In fact, let’s call it SeleniumDrivers instead.
How to add ChromeDriver path to Environment Variables
We’re going to add the path of this folder to our system Environment Variables because that will make our lives easier.
On Windows 10, I’ll click the start button and type Settings.
Over here I’ll search for environment variables.
I’ll select “Edit the system environment variables”
Click on “Environment Variables” button
Double click “Path”
Click “New” and paste the path of the folder where you’ve placed the Chrome driver.
Now close the environment variables.
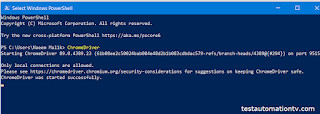
A quick way to see if you’ve configured the path correctly is by opening PowerShell and running the command “ChromeDriver”.
You see that the console says “Chrome Driver started successfully”
Let’s close the window and proceed.
This is the end of this article. Do check the previous articles in this series and the next one(coming soon).
All articles in Robot Framework Tutorial Series
- Introduction to Robot Framework, Test Automation, and RPA Tool
- Installing RobotFramework, RobotFrameworkSelenium, Python on your PC & updating Pip
- Robot Framework with VS Code and RF Language Server
- The role of browser driver in test automation and downloading Google ChromeDriver to use with Selenium and Robot Framework


